Showing posts with label dessert. Show all posts

Monday, October 14, 2013

Salted Caramel Shortbread

I have to admit...this recipe is right up my alley. It's made of mostly butter, which is one of my favorite foods (yes, when people ask me what my favorite food is I have been known to say "butter") and it's pretty easy to whip up yet looks amazingly difficult and fancy. I like to look fancy. Don't we all??

Did I also mention that salted caramel is trendy? Yup...like quinoa and gorgonzola, salted caramel is a trendy flavor. But really, the salty sweet idea has been around forever! Chocolate covered pretzels!! Kettle popcorn! All yummy because of the sweet and salty flavors. Whatever the reason, I'm not complaining. These are to die for. I mean, seriously, I made another batch because I was craving them so bad!!

I wish I craved healthy food, but I don't.

Anyway, I came across this recipe on Pinterest (the original recipe is found here at Erica's Sweet Tooth). It's funny, because I have a bajillion recipes on Pinterest, but only the special ones actually get made. These are special. Times a lot.

Oh, and I find it ironic that I pinned these to my "Gift Ideas" board, and I've made them twice and eaten them all myself. Maybe third times a charm??

Don't let the caramel part scare you. You really just dump the ingredients in the pot, stir and watch your candy thermometer until it gets to 230. You can get a candy thermometer anywhere for a few bucks and I've used mine several times over the past couple of years. But really, if you only use it for this recipe it's worth it.
You can see here the parchment paper hanging over the edge just a bit. It allows me to pull the entire batch out and cut it easier.
 

I cut mine into 1 inch squares. You know, bite size. For me.

Salted Caramel Shortbread

for the shortbread layer:

10 tbsp unsalted butter, at room temperature
1/2 cup sugar
1/2 tsp salt
1 egg yolk
1-2/3 cups flour

for the caramel:
1 cup unsalted butter
1 cup light brown sugar
3/4 cup light corn syrup
2 tsp sea salt, plus more for sprinkling on top
4 tbsp sugar
4 tbsp heavy cream
1-1/2 tsp vanilla extract

Directions:

Line an 8×8″ pan with parchment paper (not wax paper!!). Leave some hanging over the sides so you can remove the shortbread caramel goodness later. Oh, and as a precaution, don't let too much hang over and then let that too much touch the heating element of your oven. It may cause a small fire (um...I know this from experience, but that's another story for later...)

In a large bowl combine the butter, sugar, and salt with a fork or pastry cutter and then add the egg yolk and continue mixing.  Add the flour and use your hands to combine the dough until it has formed coarse crumbs. Transfer the dough into the prepared pan and press it down into one even layer. I try to made the sides a teensy bit higher for the caramel, but that's just me. Refrigerate for 30 minutes. This let's the butter cool a bit so it cooks better, so don't skip this step!

Preheat oven to 350 degrees and bake for 25 minutes, until slightly golden brown. Set aside to cool. 

For the caramel, combine the butter, brown sugar, corn syrup, salt, sugar, and heavy cream. Bring to a boil and stir for about 5-10 minutes until caramel reaches the “soft ball stage” at around 230 degrees. I actually let mine go a minute or so longer after it has reached the 230 degrees. I find it makes the caramel a tad stiffer later.

Remove from heat, stir in the vanilla and carefully pour caramel over the shortbread.

Refrigerate for at least 3 hours, then sprinkle with sea salt and cut into squares. Store caramels in the fridge until you’re ready to eat them. Don't leave them out to room temperature. The caramel will turn soft and then it's not pretty anymore. Seriously, leave them in the fridge when not eating them!

Sunday, July 21, 2013

Raspberry Peach Cobbler

I have recently found out how FABULOUS Farmer's Markets are! My family lives around several that fall on different days of the week, and we try to go to as many as we can.

Recently I got a flat of raspberries at the market, and while reading Kate Morton's The Secret Keeper the main character made a raspberry cobbler. Genius! It was a great idea to use up some of the raspberries. Although, seriously, my kids could eat them plain within a 24 hour period, I really wanted to try something new.

This cobbler is so perfect for a summer's day, topped with ice cream. And feel free to change it up! Use blueberries instead of raspberries or peaches! What fruit do you have in your fridge??


Raspberry Peach Cobbler
by Girls in Aprons

 
Cobbler Fruit -
3 cups fresh raspberries
2 large peaches, peeled & sliced
3 tablespoons all purpose flour
1/3 cup granulated sugar
1/2 lemon, juiced
1/4 teaspoon cinnamon

Cobbler Topping-
3 tablespoons butter, melted
1/3 cup packed brown sugar
1/3 cup all purpose flour
2/3 cup rolled oats
1/4 teaspoon cinnamon

Preheat an oven to 350 degrees. Spray or butter a 9x9 greased pan and set aside.

In a large bowl, mix together the peaches and raspberries. Combine the flour, sugar and cinnamon in a small bowl and sprinkle over fruit. Pour lemon juice over and carefully stir. Try to keep the raspberries in tact.

In a smaller bowl, melt the butter. Add brown sugar, flour, oats and cinnamon. Mix well and sprinkle evenly over the fruit. Bake at 350 for 30 to 40 minutes or until bubbly and the peaches are soft.

Recipe from www.laurenslatest.com

Monday, June 17, 2013

Lunch Lady Peanut Butter Bars

These little beauties are popping up on Pinterest, touting themselves as "Lunch Lady" bars. Apparently they are so easy to make that lunch ladies in schools all across America used to make them as a dessert for the kids. This was obviously before peanut butter was banned in most schools, and I don't remember these desserts at all from any of my school lunches. But I still had to try them. And I wasn't disappointed. So easy and so yummy! Perfect for summer BBQs and potlucks too.

It makes an entire jelly roll pan. And this one was my biggest pan!

The peanut butter bar with the chocolate frosting on top is a winner!

Peanut Butter Lunch Lady Bars

1 cup sugar
1 cup brown sugar, firmly packed
1 cup butter
1 tsp vanilla
2 eggs
2 1/2 cups peanut butter (divided)
2 cups oatmeal (not quick)
2 cups flour
1 tsp baking soda
1 tsp salt

Cream first 3 ingredients together. Add the vanilla, eggs, and 1 cup peanut butter and combine. Add the remaining ingredients and mix together. Spread dough on a greased jelly roll pan (18x13x1″). Make at 350 degrees for 15 minutes (until golden brown). While hot spread the other 1 1/2 cups peanut butter on top. Drop all over top by little spoonfuls. It will soften (melt) and make it easier to spread. Then let cool so that the peanut butter has become solid again (I usually throw them in the fridge so they set up faster and so I can eat them sooner!). Spread the chocolate frosting on top and cut into bars.

Chocolate Frosting

1 stick (1/2 cup) butter, softened
1/4 cup milk
1-2 tsp vanilla (depending on your taste)
3 Tablespoons cocoa 2-3 cups of powdered sugar
Mix all ingredients with a hand mixer until smooth and spread on top of bars.


recipe from Six Sisters Stuff

Monday, June 10, 2013

Peach Upside-Down Cake with Blueberry Sauce

My oldest son, Hayden, turned 9 today. According to the library's summer reading program, he's in the "tween" category. Tweens make me thinks of little girls in braces fawning over One Direction but I'm not quite sure what to make of a tween boy. What do they do? As far as I can tell in my limited experience of being a mom of a tween (one whole day), tween boys love video games, playing soccer, and bugging their younger siblings. At least that's how it is at my house.
 
Hayden's also a little bit of a foodie, at least in my mind he is. For his birthday dinner he didn't ask for pizza or burgers or anything else a typical child might ask for. Instead he asked for black bean soup and a salad. Fine with me, I love black bean soup. He's also a fan of Nutella, a sure sign he has a great palate (right?).
 
As for dessert, I'd considered half-price shakes at Sonic. Easy peasy and no clean up. But of course he didn't want shakes (at this point I'm not sure he's my child...who turns down Sonic shakes?!). He wanted an upside-down cake. We'd had one from the grocery store a month or so ago, and he was fascinated that when you turn the cake over you have a surprise. Luckily I had peaches in the fridge, as I wasn't sure what else I could use for a last minute request like this. It turned out beautifully. I added butter and brown sugar to the bottom of the pan to help caramelize the peaches, and reduced the eggs I normally use in a cake mix to 2 eggs and then 2 egg yolks to make the cake just slightly denser. The blueberry topping was also a last minute idea as I wasn't quite sure how to top an upside down cake. Powdered sugar? Whipped cream? The blueberries bring the cake over the top. The cake is so easy to make yet everyone will think you are a baking genius!


Peach Upside-Down Cake with Blueberry Sauce
by Girls in Aprons
 
For the cake:
 
1 package yellow cake mix
1/2 cup water
2 eggs plus 2 egg yolks, at room temperature
2 tsp vanilla
1/2 cup (1 stick) butter, melted and cooled slightly
1 3.4-oz package vanilla instant pudding
1 cup (8 oz) sour cream
2-3 peaches, cored and sliced
2 Tbsp butter
1 Tbsp brown sugar, packed
 
For the sauce
 
1 pint blueberries, picked through for stems
1 Tbsp sugar
 
Mix together the cake mix, water, eggs, egg yolks, vanilla, 1/2 cup melted butter, pudding mix, and sour cream. Set aside.
 
Preheat the oven to 350 degrees. Add 2 Tbsp butter to a 9-inch pan and set inside oven as it heats up, watching for the butter to melt. As soon as the butter is melted, sprinkle the brown sugar over the butter, stirring with a spoon to help dissolve the sugar into butter. Add the peach slices to the butter, filling around the pan as much as possible without overlapping. Top carefully with the cake mix, making sure not to move the peaches around.
 
Bake for 25 minutes or until cake is lightly browned and a toothpick stuck in the middle of the cake comes out clean.
 
Cool slightly, then place a plate on top of the cake pan and flip the plate and pan over, allowing the cake to land on the plate. The peaches should be on the top.
 
To make the blueberry topping, add 1 pint blueberries to a small saucepan, using a wooden spoon to slightly squish the berries. The berries will naturally release their juices as they warm up. As the juice starts to simmer, add the sugar and stir. Allow to simmer for 2-3 more minutes.
 
Serve the cake with the blueberry sauce at room temperature.


Sunday, May 26, 2013

Cookies and Creme Popcorn

My sister-in-law Cindy got married a few weeks ago. You should know that my husband is one of her SEVEN older brothers. SEVEN!! She's had built in bodyguards from day one! Luckily the guy she married is a rock star and brother-approved. I guess that's mostly lucky for him. I would not want to be on the bad side of seven older brothers!

The reception, however, was the work of SEVEN sister-in-laws and our amazing and fearless leader - my mother-in-law. Being one of the two sister-in-laws who lives out of state, I was mostly out of the loop about what was going on for the reception. I had my jobs: hair and nails for the bride. But my LOVE was helping in the kitchen!! The food theme was popcorn and lemonade. Very country and so adorable. The tablescape turned out amazing (see below) and the popcorn was a hit! There was caramel, chili cheese, peanut butter, and (the star of the show) cookies and crème!

My sister-in-law Kristen was the popcorn chef and I watched her make her batch of Cookies and Crème Popcorn and saw how easy it was! I had to figure out the measurements, and I found what I like. If you want more chocolate add more! More cookies? Do it! I'm thinking I'll try Peanut Butter Oreos next time!!

The recipe is SO easy. And you don't have to get married or attend a reception to enjoy it! We've made it in our house for movie night and also to bag up for gifts. I made it for staff appreciation week and I've had so many requests for the recipe. So here it goes:
Don't you love the classic colors and the gorgeous food? And those flowers?? The whole thing was so cute! 
First you pop two bags of kettle corn (regular or low calorie - whatever). Don't burn the popcorn!! You'll want to dump the bags into a big bowl, shake the popcorn to get all the kernels to the bottom, and then transfer the popcorn to another big bowl, leaving the kernels behind. Nothing ruins a good bowl of popcorn like breaking your teeth on a kernel! Then you want to use a food processor (I used my Magic Bullet) to finely grind up 20 Oreo cookies.
Dump the Oreo crumbs into the popcorn and blend.
Melt 12 oz of vanilla candy melts (I used Wilton brand from Michael's) for a minute on high in the microwave. Stir. Heat again for 30 seconds and stir until smooth. Pour onto popcorn and mix mix mix!
Spread out the popcorn onto wax paper-lined cookie sheets until cooled completely. Break apart and devour. I also like to coarsely chop a handful of extra Oreos to mix into the popcorn bowl.
Yum!! So addicting!
 
Cookies and Crème Popcorn
by Girls in Aprons
 
2 bags microwave kettle corn
20 Oreo cookies, finely blended
12 oz. vanilla flavored candy melts (like Wilton)
 
Microwave popcorn according to package directions. Pour bags into a big bowl and shake it several times to remove the kernels to the bottom of the bowl. Transfer the popcorn to another big bowl and discard the kernels.
 
In a food processor (a blender doesn't work too well) grind up the 20 Oreos into fine crumbs. Mix crumbs with popcorn.
 
In a medium microwave-safe bowl, melt the candy melts on high or one minute. Stir. Heat for another 30 seconds. Stir until smooth. Pour over the popcorn, mixing with a spoon until well combined. Spread out onto two wax paper-lined cookie sheets until completely cooled. If you find you have a lot of Oreo crumbs at the bottom of your popcorn bowl, I just sprinkle it over the cooling popcorn. I don't believe in wasted Oreos!! Break apart and serve.


Tuesday, February 26, 2013

Strawberry mousse in dark chocolate cups

My sisters and I also belong to another food blog called Family Favorite Recipes started by our friend, Christina. It's a group of family and friends that contribute favorite recipes. A few years ago, Christina challenged us to an Iron Chef-type competition. Without the 60-minute time frame. Or the strange ingredients. And we didn't have snarky judges either. Nonetheless, it was fun to create a new recipe using...
 
strawberries!
 
Who doesn't love strawberries?
 
I knew immediately what I was going to do. I'd been making chocolate cups for several years, although they were made with normal cupcake-sized liners and served as bowls for ice cream. At some point in my Food Network watching years (before crazy kids and an even crazier job) I'd seen Giada make white chocolate cups with chocolate mousse. They were bite size and decadent. I figured I could easily recreate the idea with chocolate and strawberries.
 
No joke, these are amazing. It's a fancy version of chocolate dipped strawberries and you can't eat just one. My husband and I find ourselves helping ourselves to "just one more" until we've eaten the whole batch in one night.


Try painting all the way up the sides to the very top, pushing the chocolate into the crevices of the cupcake liner. I actually found it easier to keep the cupcake liners in the mini-cupcake pan while I painted them, but whatever works for you.


Pulse the strawberries in a food processor until pureed. If you want, you can use a fine sieve to strain the strawberry seeds out, but I don't. I don't even notice them.


Strawberry Mousse in Dark Chocolate Cups
by Girls in Aprons
 
For the cups:

1 bag dark chocolate or semi-sweet chocolate chips
36 mini-muffin cupcake liners

Pour half of the chocolate chips in a microwave-safe bowl and microwave in 30 second intervals, stirring after each interval, until the chocolate chips are melted. Using a small paint brush (I used one from the kids' watercolor set...washed first of course), coat the bottom and sides of the cupcake liner and place in a mini-muffin pan. Freeze until the chocolate is firm, about 30 minutes. Melt the remaining chocolate chips in the microwave and paint a second layer of chocolate into each cup (if you hold the cup up to the light you can see what parts of the cup need extra chocolate, pay special attention to the sides because they break easy, put a nice thick layer on). Freeze until completely set, about 1 hour. Peel the cupcake liners off. Place the chocolate cups on a serving tray or plate.

For the mousse:

1 cup whipping cream
3 Tbsp sugar
8 oz mascarpone cheese (found near cream cheese), at room temperature
16-18 strawberries, hulled and halved

Using an electric mixer, mix the whipping cream and sugar together until soft peaks form. Set aside.

Place the strawberries in a blender or food processor and puree. Pour strawberries and mascarpone cheese in a bowl and, using an electric mixer, beat until just mixed. Using a spatula, fold in the whipped cream. Place mousse in a pastry bag with a large tip, or a plastic freezer bag with the corner cut off, and pipe mousse into each chocolate cup. Place in the refrigerator for 30 minutes to set the mousse.

Wednesday, February 20, 2013

Orange cupcakes with raspberry cream cheese frosting

January was a special month for us. Obviously, it's the beginning of a new year, and we love that fresh start each year brings, and at least here in New Mexico it's finally starting to warm up just a bit!
 
However, the biggest reason we love January? It's our birthday! What better way to celebrate our birthday than sharing an amazing cupcake recipe with you! Moist cupcakes made with orange juice concentrate and orange zest and frosting made with cream cheese and raspberry jam. The combination is out of this world and they are so easy to make!
 
I'll be honest, I didn't make these for my birthday. My sister-in-law surprised me with a uber-rich chocolate torte from Whole Foods and that was my sugar intake for a few days, but once I was out of our sugar coma I figured I would make these.  
 
You will need to use your imagination on this picture. I initially used orange juice (thus the picture) and then made them again with orange concentrate, which is what our recipe calls for. Orange juice offers a light orange taste, but I prefer something more, um...orange-y.
 
 
Use a zester or small cheese grater to zest an orange.

 
Mix, mix, mix.

 
I use an ice cream scoop to measure out my cupcake batter so they are all the same size. And it's so easy to use!

 
Check out the zest, isn't it gorgeous!?

 
I use a large star tip and circle the frosting around the cupcake, allowing the sides to show...the orange cupcake stands out against the pink frosting.

 
Had to include this...my 4-year-old fruit-loving daughter tried to steal the raspberries as I was shooting!


Orange Cupcakes with Raspberry Cream Cheese Frosting
by Girls in Aprons
 
1 box white cake mix
4 eggs, room temperature
1/2 cup orange juice concentrate
1/2 cup (1 stick) butter, melted
1 cup sour cream
2 Tbsp orange zest

Mix all ingredients together for 30 seconds on low, or until slightly combined. Increase speed to medium for 2 minutes, or until thick and completely combined. Fill cupcake liners 2/3 full and bake according to boxed cake mix directions.
 
For frosting:
8 oz. cream cheese, at room temperature
1/2 cup (1 stick) butter, at room temperature
1 lb powdered sugar
2/3 cup raspberry jam
Raspberries, for garnish
 
Mix cream cheese, butter, powdered sugar, and raspberry jam together until well blended. Using a large star tip, frost cooled cupcakes. Garnish with a raspberry.


Monday, December 3, 2012

Chocolate Coconut Pecan Bars (aka - Faux Samoas)

I am lucky to have some family that lives close to me. I have a sister and her family, my parents, and my aunt and uncle on my dad's side and their family. It gets crazy! We sing Happy Birthday as off key as possible (it is so awful that it used to make my niece cry!) and open presents. Oh, and we eat cake and ice cream. Of course.

It's actually one of the best parts of the party! We always try new recipes, try to impress each other with our cakes and creations. And I so don't mind being the guinea pig for new dessert recipes! Bring it on!

Tonight we had a party for my son who just turned five. He wanted a Star Wars cake. I vetoed that cake. I am not a cake decorator nor to I work with fondant or have super amazing creativity when it comes to such things. So I vetoed it. But I didn't tell him that. He thought he was getting a Star Wars cake until he saw what I made. Luckily, I made Mario cupcakes or he would've been sad. Someday my kids will realize that when I'm asking what kind of cake they want for their birthday that I'm really asking for a flavor or something, not a theme.

Anyway, the Mario cupcakes were so cute and easy. They were basic cupcakes, frosted with red or green frosting with white dots (mint Mentos!). I made Mario mushrooms - we call the Big Mushrooms and One-Ups, but I'm not sure of their real names. And I got him a set of Mario figurines, so I used those on the cupcakes as decoration, and then he could play with them after.

Okay, so not the best, but good for me!

Anyway, I needed an "adult" dessert! As cute as these were, I didn't want a cupcake. I needed something amazing! So I found this recipe on Martha Stewart's website. However, it is not realy her recipe. It is an old recipe found on the back of a can of sweetened condensed milk from like 1930. Way before Martha was around! But I figure if Martha liked it, and it was as easy as it sounded, I was in!

This recipe is so easy to make and so good to eat! It's like a gourmet Samoa cookie - (hooked you right there didn't I??)
 Chocolate Coconut Pecan Bars
by Girls in Aprons

3 cups finely ground cookies (12 ounces), such as graham crackers or chocolate wafers, or a  combination (I used graham crackers, but I'd like to try Nilla Wafers!)
1/4 cup sugar
3/4 cup (1 1/2 sticks) unsalted butter, melted
1 cup pecan pieces
1 cup semisweet chocolate chips or chunks
1 can (14 ounces) sweetened condensed milk
1 1/2 cups sweetened shredded coconut
  1. Preheat oven to 375 degrees. Spray a 9x13 pan with cooking spray.
  2. In a large bowl, stir together cookie crumbs, sugar, and butter until combined. Evenly press onto bottom and up sides of prepared baking sheet. Bake about 10 minutes. Transfer to a wire rack; cool, about 20 minutes.
  3. Sprinkle cooled crust evenly with pecans and chocolate. Pour condensed milk over the top, spreading to cover completely (do not let it drip over the edges). Sprinkle with coconut.
  4. Bake until coconut is toasted, 10 to 15 minutes. Cool completely before serving (it won't hold together if you cut it while warm).

Wednesday, November 14, 2012

Smores Brownie Bites

Some of our best recipes come from our family and friends. And this one is no exception.
 
Destiny has been our friend for years. She's one of those friends that we can spend months away from, see her one day, and pick up right where we left off. She's an amazing friend and an amazing hairstylist. And an amazing baker. After you make these brownies, you'll see why.
 
I finally got the chance to make Destiny's brownies, but I wanted to do something different for a co-worker's birthday. This particular coworker is a bit of an outdoorsy girl, so smores seemed so perfect.
 
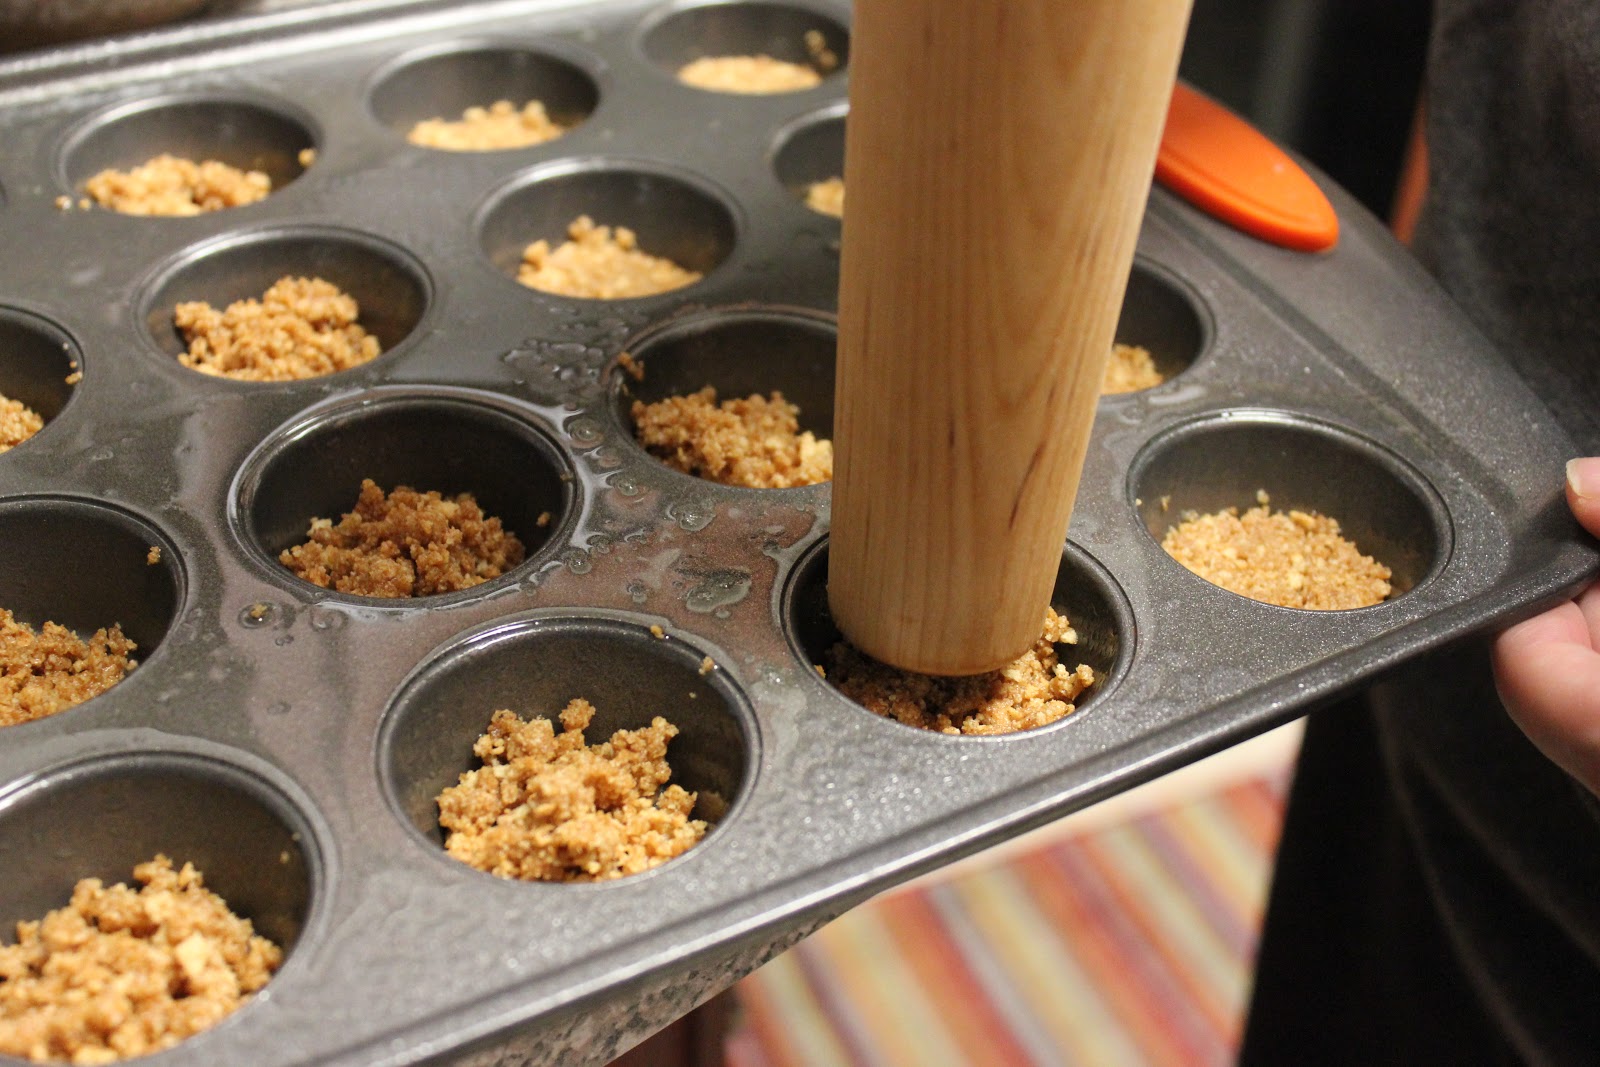
After you've made the crust and you've put it in each cup, you need to find something to press it down. I found my rolling pin worked great. For pie pans or larger pans, a glass works well.
 
 
After baking the crust and letting it cool slightly, fill with the brownie batter. If your kids don't eat it all first. Which almost happened at my house! It's so good!


Smores Brownie Bites
by Girls in Aprons

Crust:
2 cups graham cracker crumbs (about 12 sheets)
1/2 tsp ground cinnamon
1/2 cup butter (1 stick), melted

Brownie (courtesy Destiny Rayburn):
4 eggs
2 cups sugar
2 tsp vanilla
2/3 cup oil (or applesauce for a healthier version)
3/4 cup cocoa powder
1 1/2 cups flour
1/2 tsp salt

Marshmallow frosting (courtesy Martha Stewart):
8 large egg whites
2 cups sugar
1/2 tsp cream of tartar
2 tsp vanilla extract

Preheat oven to 350 degrees.

For crust, mix graham cracker crumbs, cinnamon, and butter together in a large bowl. Pour 1 Tbsp mix into each cup of a greased mini muffin tin (you will have leftovers). Bake in oven at 350 degrees for 5 minutes. Let cool slightly.

For brownies, in a large bowl, using an electric mixer, mix together the eggs, sugar, vanilla, and oil together. Add in cocoa powder, flour, and salt and mix until well incorporated and there are no lumps. Pour 1 heaping Tablespoon batter into each muffin cup. Bake at 350 for 15-18 minutes or until toothpick inserted in the middle comes out clean. Do not remove from pan.

For frosting, add egg whites, sugar, and cream of tartar in the heatproof bowl of an electric mixer. Set over a saucepan with simmering water. Whisk constantly until sugar is dissolved and whites are warm to the touch, about 3 to 4 minutes. Transfer bowl to electric mixer fitted with the whisk attachment, and beat, starting on low speed, gradually increasing to high, until stiff, glossy peaks form, 5 to 7 minutes. Add vanilla, and mix until combined. Transfer to a frosting bag fitted with a large tip. Swirl frosting onto each brownie and place under a broiler until frosting has browned, about 2-3 minutes (keep an eye on it!!!).

**You'll have extra crust, batter, and frosting. You can either make a second batch or make a second dish made from a 8- or 9-inch pie pan following the same instructions and bake for about 20-25 minutes. You can also make a large brownie dish (omit the mini brownies) in a 9x13-inch pan.