Showing posts with label chocolate. Show all posts

Monday, June 17, 2013

Lunch Lady Peanut Butter Bars

These little beauties are popping up on Pinterest, touting themselves as "Lunch Lady" bars. Apparently they are so easy to make that lunch ladies in schools all across America used to make them as a dessert for the kids. This was obviously before peanut butter was banned in most schools, and I don't remember these desserts at all from any of my school lunches. But I still had to try them. And I wasn't disappointed. So easy and so yummy! Perfect for summer BBQs and potlucks too.

It makes an entire jelly roll pan. And this one was my biggest pan!

The peanut butter bar with the chocolate frosting on top is a winner!

Peanut Butter Lunch Lady Bars

1 cup sugar
1 cup brown sugar, firmly packed
1 cup butter
1 tsp vanilla
2 eggs
2 1/2 cups peanut butter (divided)
2 cups oatmeal (not quick)
2 cups flour
1 tsp baking soda
1 tsp salt

Cream first 3 ingredients together. Add the vanilla, eggs, and 1 cup peanut butter and combine. Add the remaining ingredients and mix together. Spread dough on a greased jelly roll pan (18x13x1″). Make at 350 degrees for 15 minutes (until golden brown). While hot spread the other 1 1/2 cups peanut butter on top. Drop all over top by little spoonfuls. It will soften (melt) and make it easier to spread. Then let cool so that the peanut butter has become solid again (I usually throw them in the fridge so they set up faster and so I can eat them sooner!). Spread the chocolate frosting on top and cut into bars.

Chocolate Frosting

1 stick (1/2 cup) butter, softened
1/4 cup milk
1-2 tsp vanilla (depending on your taste)
3 Tablespoons cocoa 2-3 cups of powdered sugar
Mix all ingredients with a hand mixer until smooth and spread on top of bars.


recipe from Six Sisters Stuff

Tuesday, February 26, 2013

Strawberry mousse in dark chocolate cups

My sisters and I also belong to another food blog called Family Favorite Recipes started by our friend, Christina. It's a group of family and friends that contribute favorite recipes. A few years ago, Christina challenged us to an Iron Chef-type competition. Without the 60-minute time frame. Or the strange ingredients. And we didn't have snarky judges either. Nonetheless, it was fun to create a new recipe using...
 
strawberries!
 
Who doesn't love strawberries?
 
I knew immediately what I was going to do. I'd been making chocolate cups for several years, although they were made with normal cupcake-sized liners and served as bowls for ice cream. At some point in my Food Network watching years (before crazy kids and an even crazier job) I'd seen Giada make white chocolate cups with chocolate mousse. They were bite size and decadent. I figured I could easily recreate the idea with chocolate and strawberries.
 
No joke, these are amazing. It's a fancy version of chocolate dipped strawberries and you can't eat just one. My husband and I find ourselves helping ourselves to "just one more" until we've eaten the whole batch in one night.


Try painting all the way up the sides to the very top, pushing the chocolate into the crevices of the cupcake liner. I actually found it easier to keep the cupcake liners in the mini-cupcake pan while I painted them, but whatever works for you.


Pulse the strawberries in a food processor until pureed. If you want, you can use a fine sieve to strain the strawberry seeds out, but I don't. I don't even notice them.


Strawberry Mousse in Dark Chocolate Cups
by Girls in Aprons
 
For the cups:

1 bag dark chocolate or semi-sweet chocolate chips
36 mini-muffin cupcake liners

Pour half of the chocolate chips in a microwave-safe bowl and microwave in 30 second intervals, stirring after each interval, until the chocolate chips are melted. Using a small paint brush (I used one from the kids' watercolor set...washed first of course), coat the bottom and sides of the cupcake liner and place in a mini-muffin pan. Freeze until the chocolate is firm, about 30 minutes. Melt the remaining chocolate chips in the microwave and paint a second layer of chocolate into each cup (if you hold the cup up to the light you can see what parts of the cup need extra chocolate, pay special attention to the sides because they break easy, put a nice thick layer on). Freeze until completely set, about 1 hour. Peel the cupcake liners off. Place the chocolate cups on a serving tray or plate.

For the mousse:

1 cup whipping cream
3 Tbsp sugar
8 oz mascarpone cheese (found near cream cheese), at room temperature
16-18 strawberries, hulled and halved

Using an electric mixer, mix the whipping cream and sugar together until soft peaks form. Set aside.

Place the strawberries in a blender or food processor and puree. Pour strawberries and mascarpone cheese in a bowl and, using an electric mixer, beat until just mixed. Using a spatula, fold in the whipped cream. Place mousse in a pastry bag with a large tip, or a plastic freezer bag with the corner cut off, and pipe mousse into each chocolate cup. Place in the refrigerator for 30 minutes to set the mousse.

Monday, December 17, 2012

White Chocolate Cherry Shortbread

I'm a Pinterest addict. And that's not an exaggeration. At last count I had over 3,000 pins and I've only been on Pinterest maybe 6 months. And I've only actually used about a dozen of those pins for projects and recipes. I have a long way to go. I'd probably do more Pinterest-inspired projects if I actually owned a home AND learned how to sew. And developed a case of insomnia that allowed me several hours of nothing to do.

One of the latest things I Pinterested was a list of Christmas cookies from Better Homes and Gardens. I chose these cookies based on the picture alone. I think I thought they were white chocolate peppermint cookies, so I was a bit surprised to find they were cherry. I'm not a fan of marashino cherries. I don't understand why they have to come on every milkshake I order. But, I put judgement aside and judged a book by its cover...or in this case, a cookie by its picture. The picture was gorgeous, I just had to try it out. I just made a few tiny adjustments.


I don't even like maraschino cherries, but in this cookie they are amazing!


I drained my cherries first in a colander before laying them on the paper towels to drain again. Love the color!


Cutting the butter in. When a recipe asks for cold butter, they really means COLD. I chop up my butter into small cubes and then put it in the freezer for 5-10 minutes before cutting it in. You can also use your Kitchenaid mixer for this.


The batter. It's shortbread, so it's going to be dry. If it's too dry and you can't seem to knead it in a ball, add a little water or cherry juice, but only a little. You want the shortbread to be flaky.


I didn't dip my cookies. I really wanted the cherries to shine through and thought if the cookies were dipped the white chocolate might overshadow the cherries. A drizzle and a sprinkling of white sprinkles turned out beautifully. A great balance of cherry and white chocolate.


White Chocolate Cherry Shortbread
by Better Homes and Gardens

1/2 cup maraschino cherries, drained and finely chopped (about a 10 oz jar)
2 1/2 cups all-purpose flour
1/2 cup sugar
1 cup cold butter
12 ounce white chocolate baking squares with cocoa butter, finely chopped (I used white chocolate chips instead of baking squares. Saved me a ton of money and chopping time)
1/2 teaspoon almond extract
2 drops red food coloring (optional) (I didn't use red food coloring. My son is allergic to it so we don't even have it in the home. You are welcome to use that or add juice from the cherry jar for extra cherry taste and to give the cookies a red tint)
2 teaspoons shortening

White nonpareils and/or red edible glitter (optional)
1. Preheat oven to 325 degrees F. Spread cherries on paper towels to drain well.
2. In a large bowl, combine flour and sugar. Using a pastry blender, cut in the butter until mixture resembles fine crumbs. Stir in drained cherries and 4 ounces (2/3 cup) of the chopped chocolate. Stir in almond extract and, if desired, food coloring. Knead mixture until it forms a smooth ball.
3. Shape dough into 3/4-inch balls. Place balls 2 inches apart on an ungreased cookie sheet. Using the bottom of a drinking glass dipped in sugar, flatten balls to 1-1/2-inch rounds.
4. Bake in preheated oven for 10 to 12 minutes or until centers are set. Cool for 1 minute on cookie sheet. Transfer cookies to a wire rack and let cool.
5. In a small saucepan, combine remaining 8 ounces white chocolate and the shortening. Cook and stir over low heat until melted. Dip half of each cookie into chocolate, allowing excess to drip off. If desired, roll dipped edge in nonpareils and/or edible glitter. Place cookies on waxed paper until chocolate is set. Makes about 60.


Monday, December 3, 2012

Chocolate Coconut Pecan Bars (aka - Faux Samoas)

I am lucky to have some family that lives close to me. I have a sister and her family, my parents, and my aunt and uncle on my dad's side and their family. It gets crazy! We sing Happy Birthday as off key as possible (it is so awful that it used to make my niece cry!) and open presents. Oh, and we eat cake and ice cream. Of course.

It's actually one of the best parts of the party! We always try new recipes, try to impress each other with our cakes and creations. And I so don't mind being the guinea pig for new dessert recipes! Bring it on!

Tonight we had a party for my son who just turned five. He wanted a Star Wars cake. I vetoed that cake. I am not a cake decorator nor to I work with fondant or have super amazing creativity when it comes to such things. So I vetoed it. But I didn't tell him that. He thought he was getting a Star Wars cake until he saw what I made. Luckily, I made Mario cupcakes or he would've been sad. Someday my kids will realize that when I'm asking what kind of cake they want for their birthday that I'm really asking for a flavor or something, not a theme.

Anyway, the Mario cupcakes were so cute and easy. They were basic cupcakes, frosted with red or green frosting with white dots (mint Mentos!). I made Mario mushrooms - we call the Big Mushrooms and One-Ups, but I'm not sure of their real names. And I got him a set of Mario figurines, so I used those on the cupcakes as decoration, and then he could play with them after.

Okay, so not the best, but good for me!

Anyway, I needed an "adult" dessert! As cute as these were, I didn't want a cupcake. I needed something amazing! So I found this recipe on Martha Stewart's website. However, it is not realy her recipe. It is an old recipe found on the back of a can of sweetened condensed milk from like 1930. Way before Martha was around! But I figure if Martha liked it, and it was as easy as it sounded, I was in!

This recipe is so easy to make and so good to eat! It's like a gourmet Samoa cookie - (hooked you right there didn't I??)
 Chocolate Coconut Pecan Bars
by Girls in Aprons

3 cups finely ground cookies (12 ounces), such as graham crackers or chocolate wafers, or a  combination (I used graham crackers, but I'd like to try Nilla Wafers!)
1/4 cup sugar
3/4 cup (1 1/2 sticks) unsalted butter, melted
1 cup pecan pieces
1 cup semisweet chocolate chips or chunks
1 can (14 ounces) sweetened condensed milk
1 1/2 cups sweetened shredded coconut
  1. Preheat oven to 375 degrees. Spray a 9x13 pan with cooking spray.
  2. In a large bowl, stir together cookie crumbs, sugar, and butter until combined. Evenly press onto bottom and up sides of prepared baking sheet. Bake about 10 minutes. Transfer to a wire rack; cool, about 20 minutes.
  3. Sprinkle cooled crust evenly with pecans and chocolate. Pour condensed milk over the top, spreading to cover completely (do not let it drip over the edges). Sprinkle with coconut.
  4. Bake until coconut is toasted, 10 to 15 minutes. Cool completely before serving (it won't hold together if you cut it while warm).

Wednesday, November 14, 2012

Smores Brownie Bites

Some of our best recipes come from our family and friends. And this one is no exception.
 
Destiny has been our friend for years. She's one of those friends that we can spend months away from, see her one day, and pick up right where we left off. She's an amazing friend and an amazing hairstylist. And an amazing baker. After you make these brownies, you'll see why.
 
I finally got the chance to make Destiny's brownies, but I wanted to do something different for a co-worker's birthday. This particular coworker is a bit of an outdoorsy girl, so smores seemed so perfect.
 
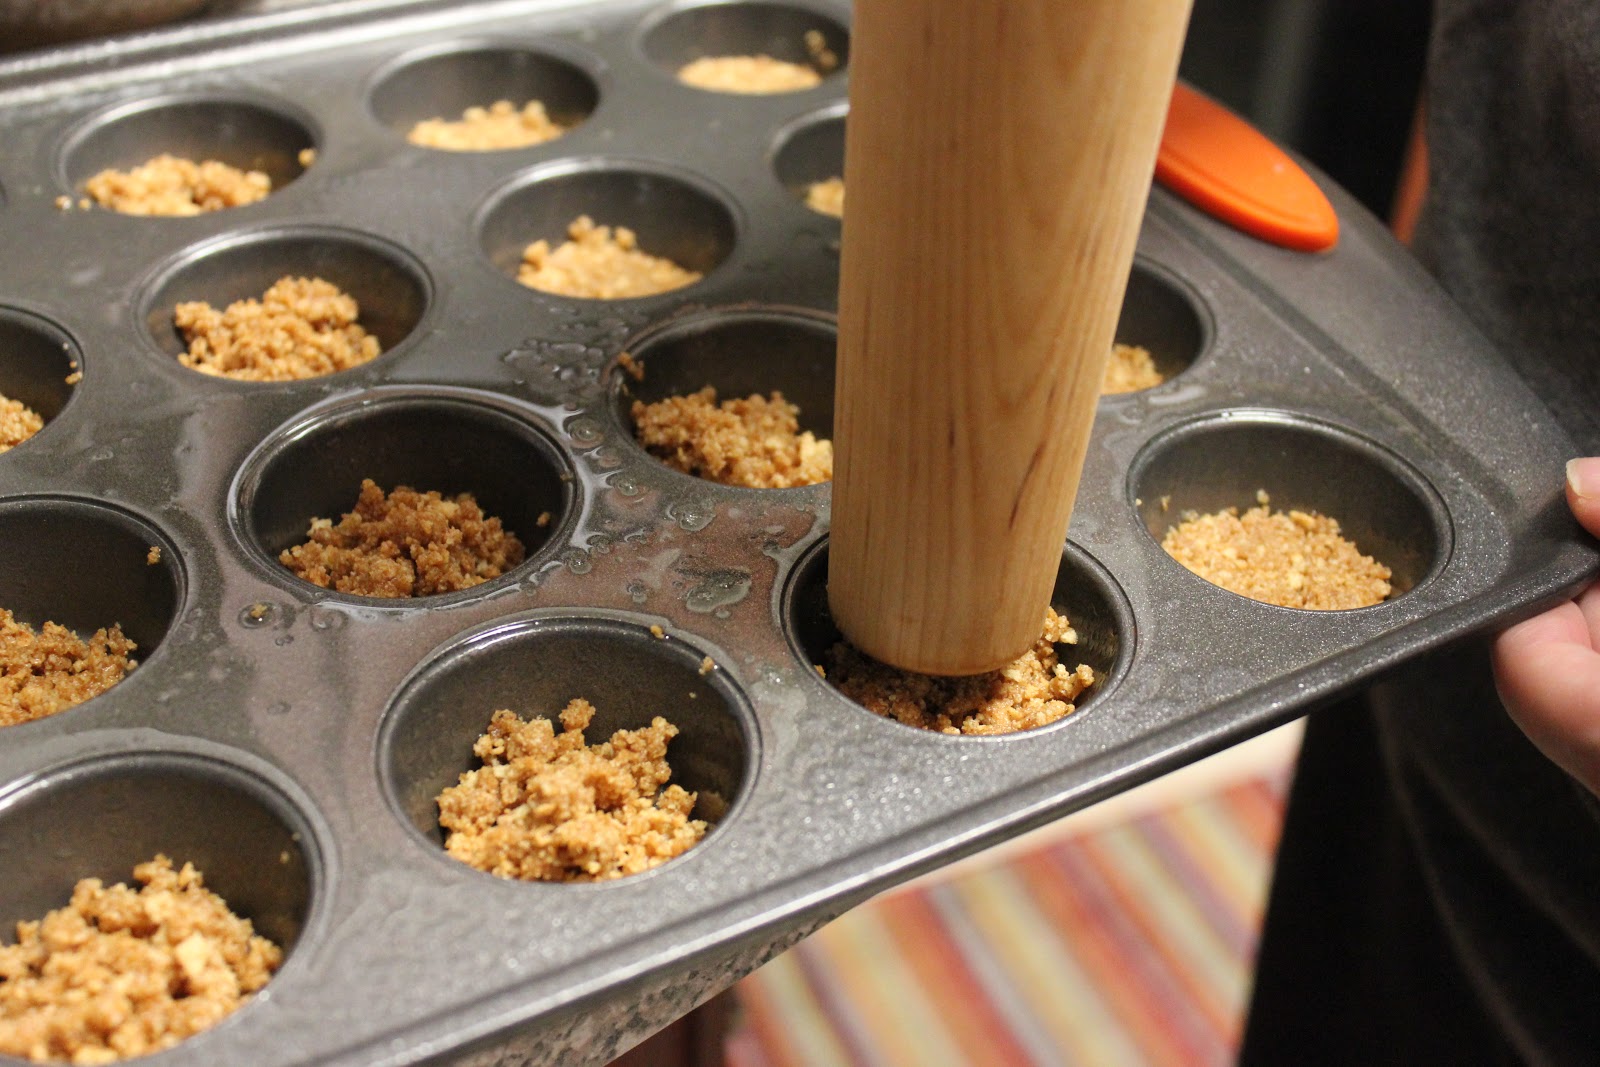
After you've made the crust and you've put it in each cup, you need to find something to press it down. I found my rolling pin worked great. For pie pans or larger pans, a glass works well.
 
 
After baking the crust and letting it cool slightly, fill with the brownie batter. If your kids don't eat it all first. Which almost happened at my house! It's so good!


Smores Brownie Bites
by Girls in Aprons

Crust:
2 cups graham cracker crumbs (about 12 sheets)
1/2 tsp ground cinnamon
1/2 cup butter (1 stick), melted

Brownie (courtesy Destiny Rayburn):
4 eggs
2 cups sugar
2 tsp vanilla
2/3 cup oil (or applesauce for a healthier version)
3/4 cup cocoa powder
1 1/2 cups flour
1/2 tsp salt

Marshmallow frosting (courtesy Martha Stewart):
8 large egg whites
2 cups sugar
1/2 tsp cream of tartar
2 tsp vanilla extract

Preheat oven to 350 degrees.

For crust, mix graham cracker crumbs, cinnamon, and butter together in a large bowl. Pour 1 Tbsp mix into each cup of a greased mini muffin tin (you will have leftovers). Bake in oven at 350 degrees for 5 minutes. Let cool slightly.

For brownies, in a large bowl, using an electric mixer, mix together the eggs, sugar, vanilla, and oil together. Add in cocoa powder, flour, and salt and mix until well incorporated and there are no lumps. Pour 1 heaping Tablespoon batter into each muffin cup. Bake at 350 for 15-18 minutes or until toothpick inserted in the middle comes out clean. Do not remove from pan.

For frosting, add egg whites, sugar, and cream of tartar in the heatproof bowl of an electric mixer. Set over a saucepan with simmering water. Whisk constantly until sugar is dissolved and whites are warm to the touch, about 3 to 4 minutes. Transfer bowl to electric mixer fitted with the whisk attachment, and beat, starting on low speed, gradually increasing to high, until stiff, glossy peaks form, 5 to 7 minutes. Add vanilla, and mix until combined. Transfer to a frosting bag fitted with a large tip. Swirl frosting onto each brownie and place under a broiler until frosting has browned, about 2-3 minutes (keep an eye on it!!!).

**You'll have extra crust, batter, and frosting. You can either make a second batch or make a second dish made from a 8- or 9-inch pie pan following the same instructions and bake for about 20-25 minutes. You can also make a large brownie dish (omit the mini brownies) in a 9x13-inch pan.

Monday, October 22, 2012

Chocolate Gooey Butter Cookies

 I love this title.

Chocolate? Yes please! Gooey? Mmmm... the best. Butter? Why not? Cookies? Love them!

This recipe has followed me from my Cleveland days. My husband, who doesn't like chocolate, loves these cookies. Like, loves them. These little morsels don't last a day in our house! They are super soft and exactly what the title says- gooey. The center has this soft, gooey-like texture that is amazing.

Obviously, this is a Paula Deen recipe. She makes great desserts, doesn't she? And this one doesn't disappoint. It has the butter in it, doesn't it?! And if you are interested in checking other "gooey butter" recipes out, she has an amazing Pumpkin Gooey Butter Cake that is perfect for this time of year!

You are going to start out with your dough, which is super thick. It needs to be put in the freezer for about an hour so you are able to roll it into a ball....
Like so. About a Tablespoon size, I go for about the size of a golf ball.
Roll each into powdered sugar. Yes, it's that kind of cookie.
Place on an ungreased cookie sheet. They don't get much bigger but you don't really want to crowd your pan so don't put them too close together. And don't overcook them. They'll look undercooked but once they cool they are perfect!
Let them cool on a wire rack. And try to resist eating them! They are super yummy warm, but you really get that gooey center when they are cooled.
Top with a little extra powdered sugar. More powdered sugar never hurt anyone. Unless you've breathed it in before...

Chocolate Gooey Butter Cookies

1 (8-ounce) brick cream cheese, room temperature
1 stick butter, at room temperature
1 egg
1 teaspoon vanilla extract
1 (18-ounce) box moist chocolate cake mix
Powdered sugar, for rolling and dusting

Preheat oven to 350 degrees F.


In a large bowl with an electric mixer, cream the cream cheese and butter until smooth. Beat in the egg. Then beat in the vanilla extract. Beat in the cake mix. Cover and refrigerate for 2 hours (or freeze for about an hour) to firm up so that you can roll the batter into balls. Roll the chilled batter into tablespoon sized balls and then roll them in powdered sugar. Place on an ungreased cookie sheet, 2 inches apart. Bake 12 minutes (no more!). The cookies will remain soft and "gooey." Cool completely and sprinkle with more powdered sugar, if desired.

Recipe courtesy Paula Deen- Foodnetwork.com

Tuesday, August 14, 2012

Chocolate Peanut Butter Sandwich Cookies

My favorite candy of all time is Reese's peanut butter cups. I get a Reese's Blizzard every time we go to Dairy Queen. There is no "branching out" for me. Cheesecake Factory has a chocolate peanut butter cheesecake that I get every time. I don't even care that it has enough calories to last me a week.

It runs in our family, too...sort of. Celeste's husband was convinced to find out the gender of their third baby (he wanted to keep it a surprise, something I feel is a bit like torture) when a friend baked him a chocolate peanut butter cheesecake. It was just that good.

Oh, and they had a boy.

So when I went to the store to get school lunch supplies for the kids, I was bummed that there were no chocolate peanut butter cookies. For me, not for the kids. They got Chips Ahoy. So instead I grabbed a box of cake mix and decided that I would have to make my own, dang it!

Ever had cake mix cookies? They're a lot of fun, especially when you find a new flavor of cake mix, like strawberry or butter pecan. The possibilities really are endless, and they are so easy to make. Hardly any measuring and certainly less dishes to do!


I rolled the cake mix into balls about the size of a small ping pong ball. This allowed for same-size cookies, and they didn't flatten too much.


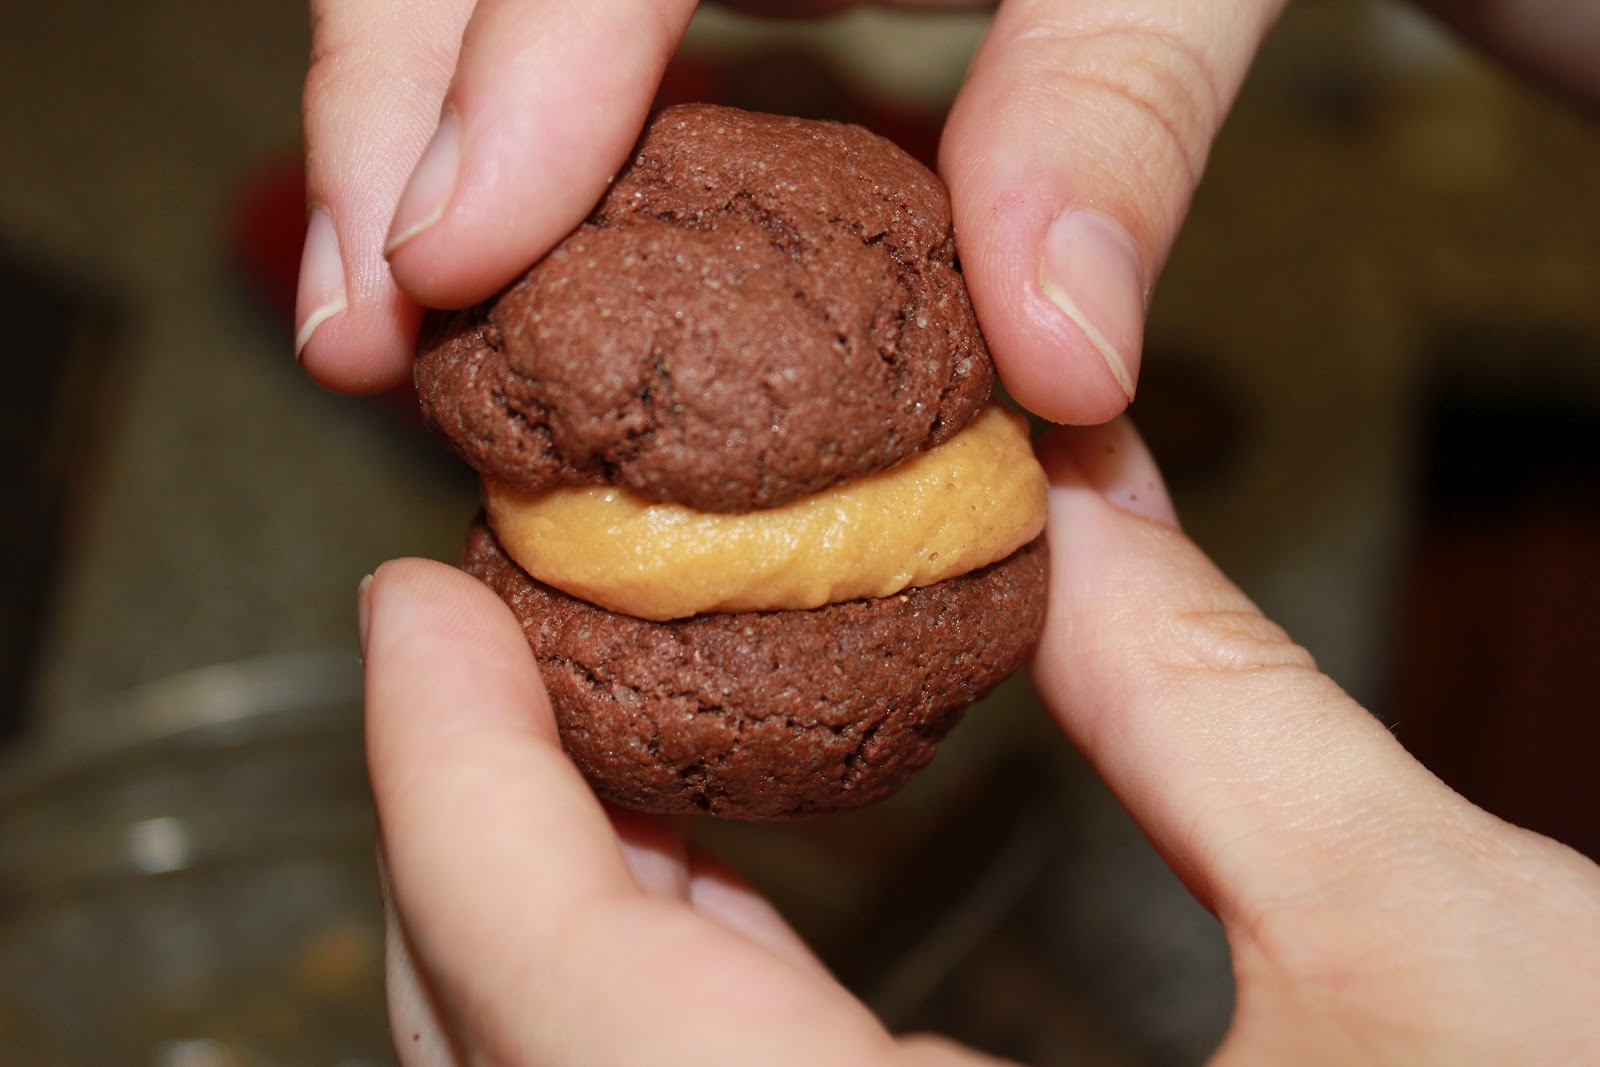
Be generous with the frosting, mostly because it's insanely delicious but also because the cookies are pretty thick and you don't want to lose the frosting in all the chocolatey-ness of the cookies.


See how the cookies are the same size? You could certainly make your cookies bigger or smaller, the key really is just making them the same size.


Chocolate Peanut Butter Sandwich Cookies
by Girls in Aprons

Cookie mix:
1 package chocolate cake mix, any variety (I used devil's food cake)
1 egg
1/4 cup water
1/4 cup vegetable oil

Peanut Butter Filling
1 cup creamy peanut butter
3/4 cup powdered sugar
2-3 Tbsp milk

Preheat oven to 350 degrees F.

Using an egg beater or stand mixer fitted with a paddle attachment, mix cake mix, egg, water, and oil together on medium speed until well blended. Roll by tablespoonfuls and place on a greased cookie sheet one inch apart. Bake for 15 minutes. Allow to cool for 5 minutes on cookie sheet before transferring to a wire rack to finish cooling.

Meanwhile, mix peanut butter and powdered sugar together with a whisk. Add milk one tablespoonful at a time until smooth but not thick, about the thickness of canned frosting.

Place a cookie upside down in one hand and apply a generous amount of peanut butter frosting to the bottom end. Top with another cookie and place on a plate. Repeat with the rest of the cookies.

You can dust the cookies with more powdered sugar or roll the sides in crushed peanuts, too.